Digital accessibility means that websites, applications, and digital content is designed and developed so that people with disabilities can understand and interact with them on any device used to access the internet.
The Americans with Disabilities Act of 1990/2008 (ADA) and the Rehabilitation Act of 1973 require colleges and universities to provide individuals with disabilities equal access to programs, services, and activities. WCAG 2.2 is the officially accepted standard, it has three levels of compliance: A, AA and AAA and demands compliance with A and AA criteria.
The Industry Standard bench mark score for Education is (83.4 AA).
How to Meet WCAG Guidelines (Quick Reference) W3 Schools website.
Web compliance is an ongoing process, our goal is to address A level issues first, then sustaining the website at a AA standard. The best way to make a web page compliant is to consider the audience first and address issues when creating new content.
Accessibility Checklist
Accessibility Checklist (PDF) for documents
Web Pages
- SEO Title
- Headings in order (H2-H5)
- Title each module
- Alternative-text for images
- Descriptive and consistently named anchor links
- Title and description on tables
- Follow Form Best Practices
Social Media Checks
- Apply accessibility checks to Social Media
- Image description or Alt-text check auto generated text for accuracy
- Use vIdeo captions (YouTube provides multiple downloadable formats
Videos Checks (On website)
- Identifiy videos with a description
- Proofread captions
- Link to a text transcript (If the video is providing information)
Videos Checks (On YouTube)
- Video descriptions and details, link back to the website
- Proof read captions, (Download text for social media video captions)
Accessibility Area Checks
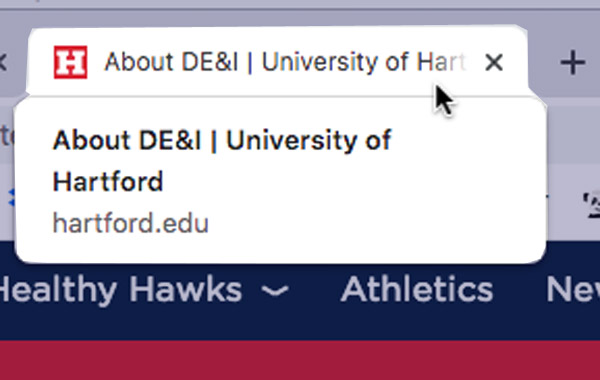
The SEO Title is the first Identifier of a web page, it appears at the top of a web browser or on an open window tab. It is displayed as a page title in web searches and is the first page description identified by a screen reader. SEO Titles should be short, descriptive, and relevant to the content on that webpage.
Use this area to add extra description and keywords that add to the page H1 title.
SEO Title Tips:
- Titles should be unique and not conflict with similar pages
- 60 characters is the ideal title length
- Titles are followed by ( | University of Hartford), consider this when determining length
- If left blank, the Page Title is used
- Use key words or search terms first followed by location
- Use an em dash (—) to separate subjects
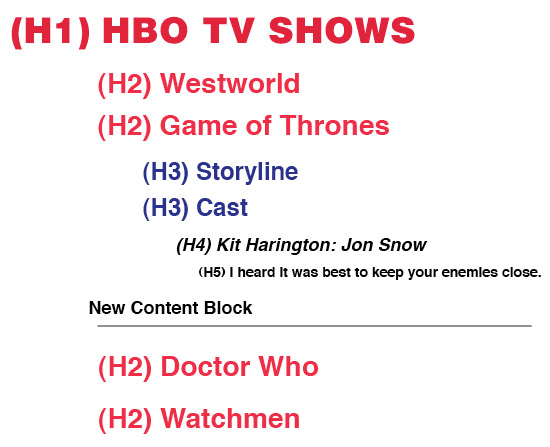
Heading style formats are H1-H6. H1 is used for the page title so use H2-H5 sequential order to format each Main Content Section. Headings should be short, descriptive, and relevant to the content within each module.
Screen readers read headers like a table of contents. Each Main Content Section starts with an H2, unless the content is a continuation from the module above, each H3 should be relevant to the H2 of that section.
Heading Tips:
- Use a Heading for each module
- Each Heading style relates to the heading above it
- Don’t skip levels or use styles for visual aesthetic
Read only the page headings, do you understand and get the important information on the page? Then the page is good to publish.
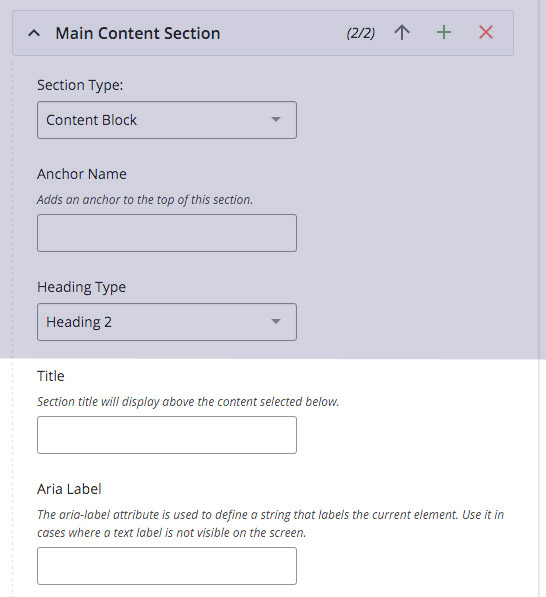
Title and Aria Label boxes appears at the top of each Main Content Section, text added here should be short, descriptive, and relevant to the content within the module.
The title is displayed above the content, in either H2 or H3 format style. H2 for a new section, H3 if it is a continuation of content from the section above it.
Leave Aria Lables Blank—Aria Labels do not display on screen, they are descriptions read by screen readers in place of a title, these labels add details and additional structure information.
All images require Alternative Text or text equivalent. When adding an image to a webpage you will be prompted to add Alt Text or an image description. This field is located below the callout text used to add an image.
For gallery images or other module options that don't provide Alt-text area, use the caption box to describe the image or event.
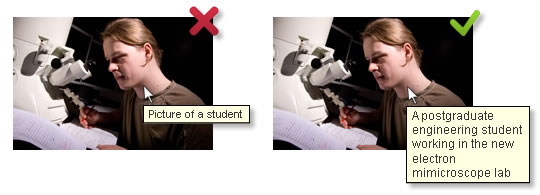
Alt text is a short phrase used to identify images on web pages and social media. Longer descriptions are used for artwork and images that display text. Adding text to an image is part of making a page accessible to the users who use assistive devices, screen readers, and non-graphical web browsers. These devices will read or display the ALT text in place of an image. It is important if an image displays information required to fully understand the web page.
Writing good ALT text
The appropriate text is determined by the context of the image (and the accompanying content). Text should be relevant to the image and not repetitive of the content.
Alt-text Walking man example
Okay alt text: "man on escalator"
Better alt text: "man walking on escalator"
Best alt text: "man wearing backpack walking down escalator"

Image and ALT Text tips:
- Describe the image as specifically as possible, while keeping it (relatively) short. (125 characters max.)
- Use purposeful keywords that are relevant to the page
- Be as concise as possible. Avoid keyword stuffing
- Don't include "image of," "picture of," etc. in your alt text
- Don't over describe the contents in the image
- Don't use images as text, or overlay text on images
- Any text within an image has to be repeated in the Alt text
- If an image does not supply an Alt Text area use Caption space to describe image

Make anchor links descriptive and consistently named
link text should be short and descriptive, relevant to where the user is being directed. The display text is link related, avoid using sentences or calls to action as a links. The Page title of the destination page is a good option.
Screen readers display a lists of all links detected on a webpage. These start with the upper and left navigation links, followed by on page and footer links. Use consistent naming for links going to the same place.
Links need to be understood out of context.
Link Tips:
- Text should describe where a link is going too
- Use type of file in the link (PDF), if linking to a document
- Avoid using: Click Here, Visit, full URLs or multiple Learn Mores, as link titles
- Have consistent link text for links going to the same place
- A descriptive Title can be added if the destination is not clear
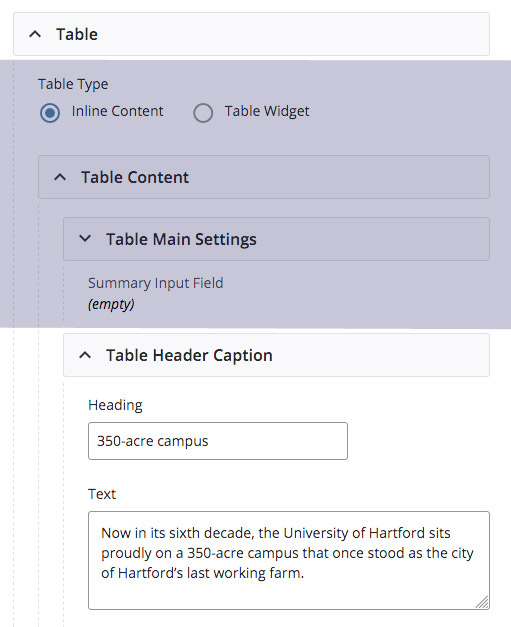
Title and Description to Tables
To make tables accessible, use a table title and description. A title can be added as H2 on a (Module), H3 in (Table Main Settings) or H4 in (Table Header Caption). Description is added in the Text section. Use the Table Header row to provide a clear description for each cell. A screen reader will read a column header first followed by the contents for each cell in a table.
Table Tips:
- Use clear and related titles in the Table Header Row.
- Don’t use table to format content.
Form Best Practices:
- Provide instructions to help users understand how to complete the form and individual form controls. (beside the form field)
- Label your fields well be as obvious as possible.
- Don’t pre-populate text.
- Divide long forms into multiple smaller forms that constitute a series of logical steps or stages and inform users about their progress. Group related content
- Ask only what is necessary
- Submission Complete page
1. Apply accessibility checks to Social Media
2. Check the image description or Alt text before posting
Social Media Channels handle image description differently. Some will write it for you or estimate what it should be based on the type of content being submitted. Check the image description, or Alt-text before submitting a post.
Where to find the image description:
Twitter.com or from the Twitter mobile app:
- Compose tweet.
- Add an image.
- Select "Add Description" This button appears on the lower portion of the image.
- In the image description window, add alt-text/description in the text box.
- Select "Apply."
NOTE: Descriptions/alt-text can only be added to JPEG images.
Edit alt text for a photo before you post it:
- Select Photo/Video at the top of the News Feed.
- Choose the image to add.
- Select "Edit Photo" on top of the selected image, Select the "Alt Text" tab at the left on the following screen.
- The automatically generated text will be shown on the left side of the image. Select "Override generated alt text" to edit it.
- Write or edit alt text in the box. To change back to the automatically generated text, select "Clear."
- Select Save in the bottom right to save the alt text.
- Select the photo to open it.
- Select "Options" in the bottom right and select "Change Alt Text."
- Choose "Override generated alt text" or change the alt text in the text box. You can also
- Select "Clear" to change edited alt text back to the automatically generated text.
- Select "Save."
- Take a photo or uploading a photo to Instagram.
- Choose a filter and edit the image, then tap "Next."
- Select "Advanced Settings" at the bottom of the screen.
- Write alt text in the box and tap "Done."
Social Media Tips:
- Check the image description before submitting a post
- For any images with text, repeat the text in the image description
- Use short descriptive link text
- If there is too much text to include link to the relevant information
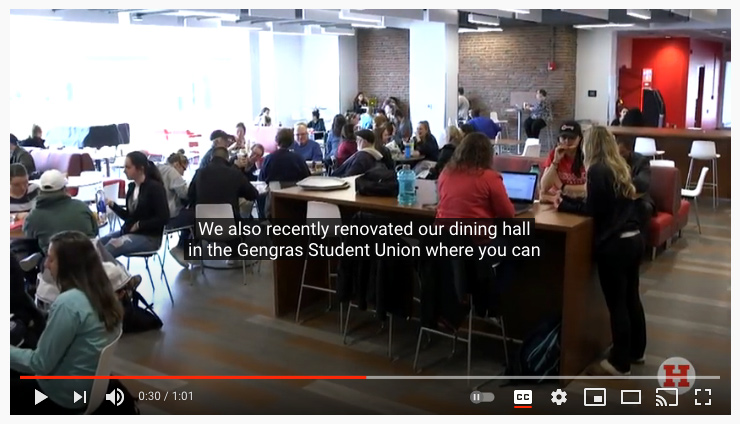
The best practice for videos is to send a viewers to YouTube to view a video or video playlist.
To meet accessibility standards for videos that are embedded, or displayed in modules on the website videos must:
- Be Identified as a video and have a description
- Have proofread captions
- Link to a text transcript (If the video is providing information)
- Add video descriptions and details, link back to the website
The Best practice for video is to send a viewer to YouTube to view a video or video playlist.
To meet accessibility standards a Video embedded, or displayed by module on the website must:
- Proof-read captions
- Link to a transcript (If the video is providing information)
Video Title
Use descriptive keywords and search phrases to create a title. Place the most important, subject-oriented keywords first. Avoid repeating words and phrases that appear in the Playlist or Video Description fields and re-stating a college name, department or location.
- (120 Character max.)
- Descriptive and relevant to video
- Include keywords or search terms
- University of Hartford and UHart, are automatically added as tags
Video Description
Be informative, concise and compelling. Explain what it's about and what to learn from it, provide titles and positions of active participants. If important to the understanding the video include: when, where, and why it was created and use simple language.
- (5000 Character max.)
- Explain the purpose or what to expect
- Front-load important information
- Large blocks of visual text should be included here (Profiles)
- Highlight important time-stamps
- Include CTAs
- Add link(s) to content or helpful resources (Program page)
- Include the appropriate level of detail
- Proof read Captions, use downloaded text for Social Media Captions
Captions
YouTube and other applications will auto-generate closed captions for uploaded videos. These will appear after a video is processed, depending on video length (Hours). These Transcripts are used for downloading and editing.
Auto-generated captions need to be edited for accuracy. Names, cities, acronyms, capitalization and punctuation needs to be proof read. Once these files are reviewed the auto-generated file is replaced, they can also be converted into the file formats used for other video platforms. (LinkedIn and Facebook)
- Caption video as soon as possible
- Identify the speakers, with their title, or a position if relevant
- Note any text overplayed on or that appears in the video
- Note any important key points time stamps
Audio Description
Audio Description is the time-based verbal description of content essential to understanding a video. Additional description is added to a transcript when context can't be conveyed through video captions.
- Changes in people speaking
- Text shown but not spoken
- Background actions or environment
- Actions being taken
Description Tips:
- Don’t show what you don’t expect people to read
- Speakers describe the visual information in the main audio
- Description is added to the playlist or video description
- Description is added to the caption file
Accessibility Tools
There are many tools used to check Accessibility both for web and document submitted into the Content Management System.
Wave - A free add-on application to Chrome and Firefox. It provides a live Accessibility check of a current web page. It shows Aria labels, Alt Text and link information for on page content.
SpeechTexter- A speech to text tool using your devices microphone.
SiteImprove - Provides a score for Accessibility, gives tips on how to fix and improve issues on the website.
When creating document that will be uploaded into the CMS run an Accessibility check first. Microsoft has a built-in accessibility checker to assist, it is not perfect but will fix some of the common issues with being read by screen-readers.